


最新文章

Struts中Resources cannot be null错误
Struts中Resources cannot be null错误...

小明博客
小明博客:分享与鉴赏的乐 园在信息爆炸的时代,我们每天都被无数的信息和知识所包围。然而,

SpringJPA 慎重 findAll() 切记分页
SpringJPA 慎重 findAll() 切记分页...

Spring 发送邮件 使用File指定附件
Spring 发送邮件 使用File指定附件...

“零添加”不能标了!如何看懂配料表吃得更安全?
“零添加”不能标了!如何看懂配料表吃得更安全?...

CentOS7上配置开机启动脚本
CentOS7上配置开机启动脚本...

deepin修改ROOT密码
deepin修改ROOT密码...
黑龙江:实施农业科技创新成果推广转化“五大”行动
黑龙江:实施农业科技创新成果推广转化“五大”行动...
Freemarker 入门示例
Freemarker 入门示例...
Linux 修改IP后,Tomcat无法启动
Linux 修改IP后,Tomcat无法启动...
Apache安装问题:configure: error: APR not found . Please read the
Apache安装问题:configure: error: APR not found . Please read the documentation...
Linux 设置网卡默认启动
Linux 设置网卡默认启动...

Spring 发送邮件 简单邮件
Spring 发送邮件 简单邮件...
Spring定时器的使用
Spring定时器的使用...

SpringMVC 表单提交参数不匹配报错
SpringMVC 表单提交参数不匹配报错...

千亿赛道上的“生死时速” 大圆柱电池能否跑出下一个宁德时代?
从特斯拉第1亿颗4680电池下线、宝马首款搭载大圆柱电池的车型量产到中国云山动力首条46系大圆柱

CentOS7上安装Redis7
CentOS7上安装Redis7...
小明博客-人才招聘
小明博客诚邀英才,共创未来!在这个信息爆 炸的时代,有一个平台始终致力于为广大网友提供高

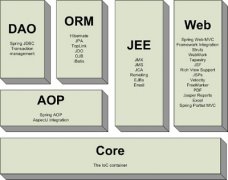
Spring 编程事物管理
Spring 编程事物管理...

SpringMVC+JPA入门示例
SpringMVC+JPA入门示例...
小明博客
xiaomingblog,ZYM,写作,小明博客,小明,小明blog
点击排行
- Apache安装问题:configure: error: APR not found . Please read the
Apache安装问题:configure: error: APR not found . Please read the documentation...
- Linux 使用脚本安装MySQL数据库
Linux 使用脚本安装MySQL数据库...
- Linux 下FTP搭建
Linux 下FTP搭建...
- CentOS7上配置开机启动脚本
CentOS7上配置开机启动脚本...
- Spring定时器的使用
Spring定时器的使用...
站长推荐
- 支持更多民营企业入场能源建设,释放什么信号?
能源是人类生存和发展的重要物质基础。随着我国经济快速发展和社会生产力显著增强,能源领域
- 千亿赛道上的“生死时速” 大圆柱电池能否跑出下一个宁德时代?
从特斯拉第1亿颗4680电池下线、宝马首款搭载大圆柱电池的车型量产到中国云山动力首条46系大圆柱
- 国投湄洲湾项目部防风网静压桩施工全部完成
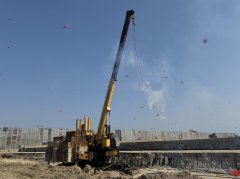 防风网静压桩施工完成国投湄洲湾煤炭码头堆场项目总施工面积20.23万平方米,静态煤炭堆储量6
 - “零添加”不能标了!如何看懂配料表吃得更安全?
“零添加”不能标了!如何看懂配料表吃得更安全?...
- 高原春光无限好——西藏百万农奴解放66周年综述
 高原春光无限好——西藏百万农奴解放66周年综述...
官方微信
